
It’s probably apparent I’m not blogging in real time for this reno…I had every intention to, but much like my plans to document Chief’s recovery from surgery, this didn’t pan out either. BUT I do want to document our reno as much as possible, even if it’s after the fact, so that we remember how much blood, sweat and tears we put into this kitchen in five years when I get another wild hair…lol. (Kidding Joey and Dad…you can all calm down now…)
Getting the new stove and removing the cabinet really sparked the rest of the chain of events that spawned our reno. We were driven to start the updates since we had holes in our ceiling, and also because we were really starting to see the potential. Also, our destructive little guy Chief was going to be on bed rest for 3 months, so it seemed like the perfect time to have this chaos going on, because he’s really the one that gets into things, Lady is at least a little more trustworthy, silly, but trustworthy.

Lady doing her Flavor Flav impression
So anyway, back to the point of this post…Lighting. We were blessed with some really unfortunate fixtures in the kitchen.
Exhibit A: Plain fluorescent light and fan.  I’m sorry, but fluorescent lights are just plain ugly. Especially the ones from the 80’s that don’t even try to conceal themselves. We lived with them in our townhouse, and they ran our power bill up like crazy. So this fixture was first on the list to go!
I loved the idea of the ceiling fan in the kitchen, and it comes in handy when your kitchen is full of smoke because your dog tried to set your house on fire…or when you burn the casserole you’re baking… 🙂 But even though it was a Hunter, this particular fan had seen better days, evidenced by the drooping in the photo above. It also was not centered in the ceiling as seen below. So once the fluorescent light was gone, it looked extra absurd.
 It also was so close to the cabinets on the side that some of them had strings attached so they wouldn’t swing open far enough to hit the fan. Super high tech solution right?? 🙂
Then there was also Exhibit B:
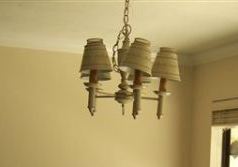 This fancy chandelier was in the eat-in portion of our kitchen and it was all kinds of dated. Cream colored with gold accents. It was probably really nice in it’s hey-day, and it probably will be really nice if someone cared enough to rehab it. I think with some spray paint, new shades and some new candlestick covers it could be pretty cute. Alas, we don’t have a place for it, so it’s sitting in our garage until it finds a new home via Craigslist or Goodwill.
We went back and forth over the lighting issue. We wanted recessed lighting…but of course that would entail a good amount of electrical work since the house wasn’t wired for it. Dad could do it, but the last thing I wanted him to have to do was spend all that time crawling around in our hot attic in the middle of the summer. I just couldn’t ask him to do that in good conscience. I’ve also heard that recessed lighting can be expensive since you need a good amount of cans for decent lighting, and a lot of times can be charged by the can. SO we decided to try a cheaper solution first, to at the very least minimize the number of can lights that would need to be installed.
So we scooted on down to Home Depot and found a new prettier Hunter Fan with a light kit. Now…I did enlist the help of my dad on this one too since he’s the fan installation extraordinaire…and it did require a little bit of attic work….but not the same extent that the recessed lighting would have. And also I planned to hire someone to do it, but in the end my dad said that was silly and said he would do it. SO I accepted. 🙂
The light from the fan was surprisingly bright, and when combined with the new pendant lights we installed over the bar, it ended up being plenty of lighting. So this was a big relief and a big cost saver. Now the pendant lights over the bar were another dilemma because I wanted something kind of stainless and industrial…the ones we really loved were really expensive of course. The top contenders for expensive fixtures were this guy (Joey’s favorite) and this one here (my fav). While neither fixture were too bad if you needed only one, we were thinking we needed three which would have taken it WAY out of our range. I am, however, considering going with this semi-flush mount in our entryway or hallway, so I can still get my Jonathan Adler fix in our home. 🙂
Next on the list was this one but it ended up being way too large in real life, which is kind of ironic since it’s called a mini pendant. So we backed out of that one. Finally we landed on this one from Ikea. I hadn’t seen it in person, but the price was right, and Joey’s brother was coming to visit soon from Tampa, so we asked him to pick up two. Once installed, we were on the fence about them, mostly because one of them just never hung quite right (I guess that’s the gamble you take with Ikea) but I think now I’ve decided that we like them enough to let them stay and luckily they were only $30 a pop so if we hate them later, I won’t feel too bad replacing them.
And for the eat-in chandy replacement, I wanted a drum shade pendant. There was a lot of drama involved with this light, I had a really hard time finding what I wanted. I had registered for this light with Crate and Barrel, when we registered for it I had intended it for the dining room in our townhouse, but we figured it would work in our new house. At the time I didn’t realize that it had only a cord to hang by, back when I registered the cord was always out of the picture so you couldn’t tell it didn’t have a downrod. When I finally saw the light in the C&B store, I knew the cord would drive me nuts. Which was sad because the pendant was perfect otherwise. So that one was returned. Then I ordered another one from CB2, again with the cord, so back it went. Finally I found a pendant kit from Amazon that was perfect and a white shade from Target to top it off. So up it went and it’s perfect and it only cost us around $50 for the kit and $15 for the shade. So we saved around $134 not going with the C&B light. Woohoo! Which meant we had C & B store credit for later kitchen purchases…Hooray!

Pardon the poor lighting in this photo. The downrod on this appears to be ORB but it’s really a brushed nickel finish
So that’s the lighting update…It all ended up being plenty of light so I think we’re going to abandon the recessed lighting plan. And all in all our lighting total came to around $225 which is kind of a steal when you think about how much we COULD have spent had we used an electrician and picked spendier fixtures.
